Showing posts with label make. Show all posts
Showing posts with label make. Show all posts
Monday, March 2, 2015
How to Make a Frame in PowerPoint
Are you looking for a way to make your TPT cover page more colorful? Or to make a bright visual for your classroom? Well... its much easier than you might think! For this weeks Technology Tuesday (and I say Tuesday loosely as its almost midnight... eek!), the winner was how to make your own frame in powerpoint!


And of course, heres the frame that I made as a freebie!
To save the files, just click the image to get to the higher quality picture, then right click (or Mac: Ctrl + Click) to save the image onto your computer!

Next week, Im going to add how to make a collage of words in any shape you want!

Read more »
This item won the poll by a large margin, but it does seem that some of the other options are becoming strong competitors! I cant wait to see what happens on next weeks poll!
Now, without further adieu...
You can download this tutorial as a PDF by clicking this picture!
Note: This tutorial is hosted on Google Docs. To save it from there, just open the file and click File > Download to save onto your computer!
And of course, heres the frame that I made as a freebie!
To save the files, just click the image to get to the higher quality picture, then right click (or Mac: Ctrl + Click) to save the image onto your computer!
Next week, Im going to add how to make a collage of words in any shape you want!

Sunday, March 1, 2015
How to Make Your Text Small Caps
Ive designed a few wedding invitations for my friends and this tip definitely came in handy since I could use any font I wanted and make it look exactly the way I wanted!
Unfortunately this tip doesnt work in PowerPoint, but it does work in Microsoft Word! (And if you want to put it into PowerPoint, you can copy/paste from work and it will keep the formatting.) I have no idea why it does work directly in PowerPoint though!

I hope you can find some uses for this in your classroom projects... Id love to hear from you if you do!
Read more »
Unfortunately this tip doesnt work in PowerPoint, but it does work in Microsoft Word! (And if you want to put it into PowerPoint, you can copy/paste from work and it will keep the formatting.) I have no idea why it does work directly in PowerPoint though!
I hope you can find some uses for this in your classroom projects... Id love to hear from you if you do!
Wednesday, February 18, 2015
Some Unknown Windows Tricks that I Mostly Use to Make my Work Easier

In this post I am listing out some tricks which I generally use while working on the computer to make my work easier. I know that these tricks are very common among people who have a good knowledge of computer. But some people who have newly purchased a computer or those who use computer occasionally are not aware of these tricks. Just go through the tricks given below and let me know your experience.
Also Read: My Mouse is not Working: How to Use Mouse With the Help of Keyboard?
Also Read: Top 8 Free Alternatives to Paid Softwares
List of Some Unknown Windows Tricks
1. What to do if your computer is hanged?
Almost every person faces this problem while working on computer. Even I also face this problem many times. Ok! I just want to ask you a question. What you do when your computer is hanged? Generally the people who don’t have so much knowledge, press CPU restart button to solve this problem. But this Is not a good practice. By doing this you can lost your unsaved data. One of the best way is given below to solve this problem.
1. Press Ctrl+Alt+Delete, a new window will open.
2. Go to Processes tab, select explorer.exe and than click on End Process.
3. Now go to Applications tab, click on New Task.
4. A new window will open, here write explorer.exe in the text box and than click OK.
5. After that your computer will start working as usual.
Note: You can also use Processes tab to close any application which is not responding. For this just follow step 1 and 2.
Note: You can also use Processes tab to close any application which is not responding. For this just follow step 1 and 2.
2. Clear my recent documents list without any software
There are so many softwares (like CCleaner) available on the internet to do this task. But there is a trick to clear recent documents list without any software.
1. First of all right click on taskbar, than on Properties.
2. Now click on Start Menu tab, than on Customize.
3. After that click on Advanced tab and than on Clear List.
4. Now check your my recent documents list, it will be empty.
Note: This process works only in windows xp not in windows 7 and 8.
Note: This process works only in windows xp not in windows 7 and 8.
Also Read: The 5 Best Softwares for Remote Assistance
Also Read: Google Gravity: How to Hack Google Homepage (Funny Trick)
Also Read: Google Gravity: How to Hack Google Homepage (Funny Trick)
3. Start any application automatically on windows startup
If you want to start any application on windows startup than just drag and drop the icon of the application that you want to Start>All Programs>Startup.
4. Delete files without going to recycle bin
Normally when you delete a file it goes to recycle bin and than you have to do recycle bin empty to delete it completely. But you can delete files directly without sending them to recycle bin.
1. Just select the files that you want to delete.
2. Now press Shift+Delete, a confirmation box will open, here click on OK.
Note: By normal deleting you can restore files again. But deleting files by the above trick you can not restore files.
Note: By normal deleting you can restore files again. But deleting files by the above trick you can not restore files.
Wednesday, February 11, 2015
How to Make Simple Login and Register System in VB Net Video Tutorial
This article is on creating a simple registration and login system without using a database in visual basic. So this project uses Properties present in My Project. The link to download the project is also given in this article.
Also Read: Lab Login System Mini Project in VB.Net
Also Read: Lab Login System Mini Project in VB.Net
The Login system will allow us to:
- Add a single user not multiple (because we are not using a database)
- Login using that credentials

Video Tutorial to Make Simple Login and Register System in VB.Net
- Download Project -
Tuesday, February 10, 2015
How to Make a Calculator App for Android
Hello everyone, in this tutorial we are going to learn how to make a calculator app for android (using Eclipse). Step by step process as well as a detailed video tutorial added in this article that will help you to make a simple calculator in very easy way. You can also download the apk file and use it as a normal app in your android phone.
Also Read: The Top 4 Websites to Create Android Apps Online for Free
Also Read: The Top 4 Websites to Create Android Apps Online for Free
Steps to Make a Calculator App for Android
1. First of all open eclipse (If your are new to android programming then go to http://developer.android.com/sdk/installing/installing-adt.html to download and configure android development tools).
2. Create a new project > Select Android Application Project > Now name your project "Calc".

3. Choose a Package Name. A Package Name is a unique URL of your Application. In most cases it is the inverse of your website.
For example: com.thecrazyprogrammer.appname
4. If you want you can leave it to the default package name which is "com.example.calc". Now hit next two times.
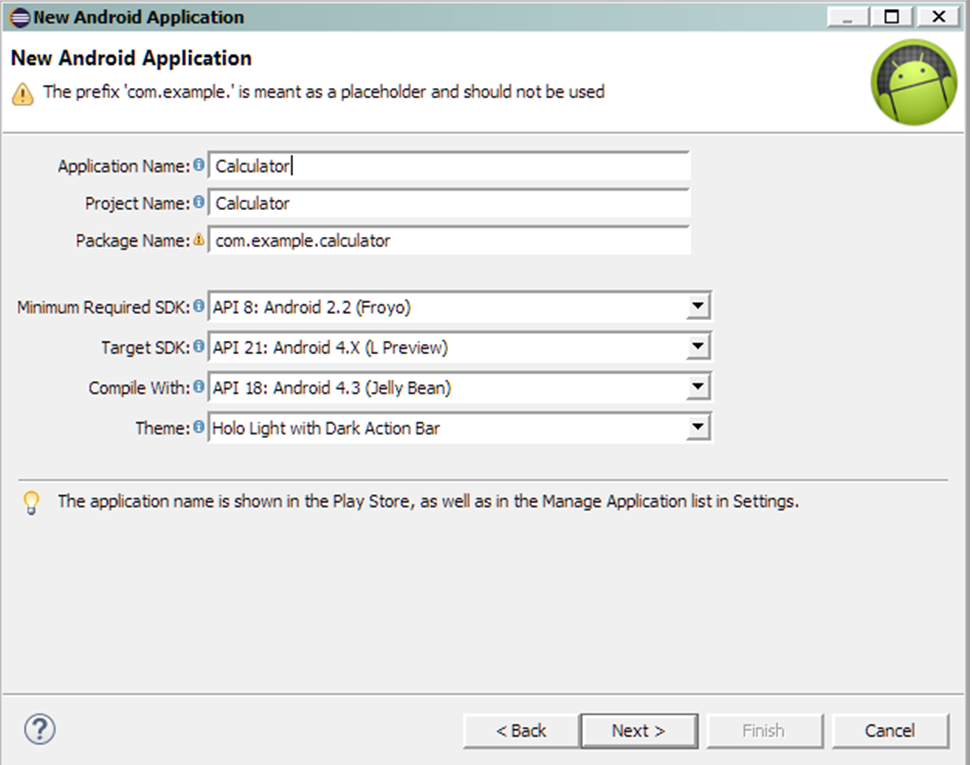
5. If you have made an Icon then add it otherwise go with the default one. Select Blank Activity > Now name your activity "GUI".

6. From Palette option add total 16 buttons & name them from 0 to 9 and +, -, X, /, ., =.

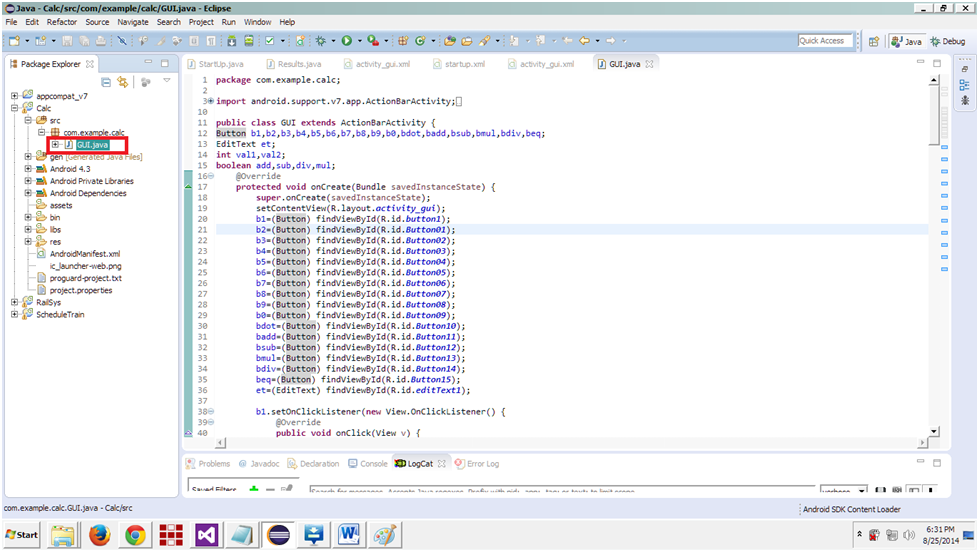
7. After completing this go to Package Explorer & under your Package Explorer Select src > Your package Name > yourActivityName.java
Also Read: C4droid: Download C/C++ Compiler for Android Platform for Free
8. Open the java file and paste the given code:
10. Download the calculator app for android from below link.
packagecom.example.calc;

import android.support.v7.app.ActionBarActivity;
importandroid.os.Bundle;
importandroid.view.Menu;
importandroid.view.MenuItem;
importandroid.view.View;
importandroid.widget.Button;
importandroid.widget.EditText;

public class GUI extends ActionBarActivity {
Button b1,b2,b3,b4,b5,b6,b7,b8,b9,b0,bdot,badd,bsub,bmul,bdiv,beq;
EditTextet;
int val1,val2;
booleanadd,sub,div,mul;
 @Override
 protected void onCreate(Bundle savedInstanceState) {
  super.onCreate(savedInstanceState);
  setContentView(R.layout.activity_gui);
  b1=(Button) findViewById(R.id.button1);
  b2=(Button) findViewById(R.id.Button01);
  b3=(Button) findViewById(R.id.Button02);
  b4=(Button) findViewById(R.id.Button03);
  b5=(Button) findViewById(R.id.Button04);
  b6=(Button) findViewById(R.id.Button05);
  b7=(Button) findViewById(R.id.Button06);
  b8=(Button) findViewById(R.id.Button07);
  b9=(Button) findViewById(R.id.Button08);
  b0=(Button) findViewById(R.id.Button09);
  bdot=(Button) findViewById(R.id.Button10);
  badd=(Button) findViewById(R.id.Button11);
  bsub=(Button) findViewById(R.id.Button12);
  bmul=(Button) findViewById(R.id.Button13);
  bdiv=(Button) findViewById(R.id.Button14);
  beq=(Button) findViewById(R.id.Button15);
  et=(EditText) findViewById(R.id.editText1);

  b1.setOnClickListener(new View.OnClickListener() {
   @Override
   public void onClick(View v) {
    // TODO Auto-generated method stub
    et.setText(et.getText()+"1");
   }
  });
  b2.setOnClickListener(new View.OnClickListener() {
   @Override
   public void onClick(View v) {
    // TODO Auto-generated method stub
    et.setText(et.getText()+"2");
   }
  });
  b3.setOnClickListener(new View.OnClickListener() {
   @Override
   public void onClick(View v) {
    // TODO Auto-generated method stub
    et.setText(et.getText()+"3");
   }
  });
  b4.setOnClickListener(new View.OnClickListener() {
   @Override
   public void onClick(View v) {
    // TODO Auto-generated method stub
    et.setText(et.getText()+"4");
   }
  });
  b5.setOnClickListener(new View.OnClickListener() {
   @Override
   public void onClick(View v) {
    // TODO Auto-generated method stub
    et.setText(et.getText()+"5");
   }
  });
  b6.setOnClickListener(new View.OnClickListener() {
   @Override
   public void onClick(View v) {
    // TODO Auto-generated method stub
    et.setText(et.getText()+"6");
   }
  });
  b7.setOnClickListener(new View.OnClickListener() {
   @Override
   public void onClick(View v) {
    // TODO Auto-generated method stub
    et.setText(et.getText()+"7");
   }
  });
  b8.setOnClickListener(new View.OnClickListener() {
   @Override
   public void onClick(View v) {
    // TODO Auto-generated method stub
    et.setText(et.getText()+"8");
   }
  });
  b9.setOnClickListener(new View.OnClickListener() {
   @Override
   public void onClick(View v) {
    // TODO Auto-generated method stub
    et.setText(et.getText()+"9");
   }
  });
  b0.setOnClickListener(new View.OnClickListener() {
   @Override
   public void onClick(View v) {
    // TODO Auto-generated method stub
    et.setText(et.getText()+"0");
   }
  });
  bdot.setOnClickListener(new View.OnClickListener() {
   @Override
   public void onClick(View v) {
    // TODO Auto-generated method stub
    et.setText(et.getText()+".");
   }
  });

 badd.setOnClickListener(new View.OnClickListener() {

  @Override
  public void onClick(View v) {
   val1=Integer.parseInt(et.getText()+"");
   add=true;
   et.setText(null);
  }
 });
bsub.setOnClickListener(new View.OnClickListener() {

  @Override
  public void onClick(View v) {
   val1=Integer.parseInt(et.getText()+"");
   sub=true;
   et.setText(null);
  }
 });
bdiv.setOnClickListener(new View.OnClickListener() {

 @Override
 public void onClick(View v) {
  val1=Integer.parseInt(et.getText()+"");
  div=true;
  et.setText(null);
 }
});
bmul.setOnClickListener(new View.OnClickListener() {

 @Override
 public void onClick(View v) {
  val1=Integer.parseInt(et.getText()+"");
  mul=true;
  et.setText(null);
 }
});

beq.setOnClickListener(new View.OnClickListener() {

 @Override
 public void onClick(View v) {
  val2=Integer.parseInt(et.getText()+"");
  if (add==true) {
   et.setText(val1+val2+"");
   add=false;
  }
  if (sub==true) {
   et.setText(val1-val2+"");
   sub=false;
  }
  if (mul==true) {
   et.setText(val1*val2+"");
   mul=false;
  }
  if (div==true) {
   et.setText(val1/val2+"");
   div=false;
  }
 }

});


 }

 @Override
 publicbooleanonCreateOptionsMenu(Menu menu) {
  // Inflate the menu; this adds items to the action bar if it is present.
  getMenuInflater().inflate(R.menu.gui, menu);
  return true;
 }

 @Override
 publicbooleanonOptionsItemSelected(MenuItem item) {
  // Handle action bar item clicks here. The action bar will
  // automatically handle clicks on the Home/Up button, so long
  // as you specify a parent activity in AndroidManifest.xml.
  int id = item.getItemId();
  if (id == R.id.action_settings) {
   return true;
  }
  returnsuper.onOptionsItemSelected(item);
 }
}
9. Right click on your project and select run as Android Application .
Now the emulator will pop up & you can test your project.

10. Download the calculator app for android from below link.
Calculator.apk
Subscribe to:
Posts (Atom)