Showing posts with label your. Show all posts
Showing posts with label your. Show all posts
Tuesday, March 10, 2015
Generate index cards from your Excel 2007 backlog
You have captured all your user stories in Excel 2007 and now you want to print them out as index cards. Follow these steps in Word 2007.
First, create the word document and select your data
1. Make sure you have headings in your excel document. Example: User Story, Points, User Story ID
2. Open Word 2007 and create a new document
3. Go to the "Mailings" tab
4. Click "Start Mail Merge" and select "Step by Step Mail Merge Wizard"
5. Click "Select Recipients" and select "Use Existing List"
6. Select your excel file and then the name of the sheet (eg. Sheet1$)
Second, setup your index cards
7. In the "Mail Merge" window (usually on the right), select the "Labels" document type and click "Next: Starting document" at the bottom.
8. Click "Label options…" to choose create a custom label size for your index cards
9. Click "New Label…"
10. Use the following settings for 4 index cards per page:
○ Label name: "Index Cards"
○ Top margin: 1.5 cm
○ Side margin: 0.6 cm
○ Vertical pitch: 13 cm
○ Horizontal pitch: 10 cm
○ Page size: Letter (8 1/2 x 11 in)
○ Label height: 12 cm
○ Label width: 9 cm
○ Number across: 2
○ Number down: 2
11. Click OK (Note - you can now re-use the new "Index Cards" label format the next time you print index cards. Look under "Product Number" on the "Label Options" window)
12. Click OK again to close the "Label Options" window
Now we add data to the index cards
13. Click "Next: Select recipients"
14. If you want to select only some of your stories, use the check box column to do so. Click OK.
15. The page should now show four labels, with the first one blank and the other three containing "<>"
16. Click "Next: Arrange your labels"
17. In the blank label, add the static text you want to display. I like to show Story ID, Points and the User Story on the card, but you can display whatever information is relevant for your project and process.
17. To add the fields from your product backlog, place the cursor where your field should go and click "More Items". Select the field you want to add and click "Insert". Repeat for any additional fields
18. Now format your fields (bold, size, positioning etc) within the first label.
19. When you are finished, click the "Update all labels" button to move your formatting to all the index cards.
20. Click "Next: Preview your labels". At this point, you should have four index cards per page populated with your stories.
21. Click "Next: Complete the merge"
22. Now print your index cards! (make sure they are not printing double sided…)
Bonus Tip: Use the "Scotch Glue Stick Restickable Adhesive" to turn your index cards into reusable sticky notes.
Want to receive future blog posts in your inbox? Enter your email address here.
Read more »
First, create the word document and select your data
1. Make sure you have headings in your excel document. Example: User Story, Points, User Story ID
2. Open Word 2007 and create a new document
3. Go to the "Mailings" tab
4. Click "Start Mail Merge" and select "Step by Step Mail Merge Wizard"
5. Click "Select Recipients" and select "Use Existing List"
6. Select your excel file and then the name of the sheet (eg. Sheet1$)
Second, setup your index cards
7. In the "Mail Merge" window (usually on the right), select the "Labels" document type and click "Next: Starting document" at the bottom.
8. Click "Label options…" to choose create a custom label size for your index cards
9. Click "New Label…"
10. Use the following settings for 4 index cards per page:
○ Label name: "Index Cards"
○ Top margin: 1.5 cm
○ Side margin: 0.6 cm
○ Vertical pitch: 13 cm
○ Horizontal pitch: 10 cm
○ Page size: Letter (8 1/2 x 11 in)
○ Label height: 12 cm
○ Label width: 9 cm
○ Number across: 2
○ Number down: 2
11. Click OK (Note - you can now re-use the new "Index Cards" label format the next time you print index cards. Look under "Product Number" on the "Label Options" window)
12. Click OK again to close the "Label Options" window
Now we add data to the index cards
13. Click "Next: Select recipients"
14. If you want to select only some of your stories, use the check box column to do so. Click OK.
15. The page should now show four labels, with the first one blank and the other three containing "<
16. Click "Next: Arrange your labels"
17. In the blank label, add the static text you want to display. I like to show Story ID, Points and the User Story on the card, but you can display whatever information is relevant for your project and process.
17. To add the fields from your product backlog, place the cursor where your field should go and click "More Items". Select the field you want to add and click "Insert". Repeat for any additional fields
18. Now format your fields (bold, size, positioning etc) within the first label.
19. When you are finished, click the "Update all labels" button to move your formatting to all the index cards.
20. Click "Next: Preview your labels". At this point, you should have four index cards per page populated with your stories.
21. Click "Next: Complete the merge"
22. Now print your index cards! (make sure they are not printing double sided…)
Bonus Tip: Use the "Scotch Glue Stick Restickable Adhesive" to turn your index cards into reusable sticky notes.
Want to receive future blog posts in your inbox? Enter your email address here.
Visualize Your Data Charts in Google Apps Script!
Charts are a great way to communicate significant amounts of data. We’ve joined forces with the Google Chart Tools team in order to bring a new Charts API to Apps Script. Every day, millions of charts are created, updated, put into presentations, emailed to managers, and published as web pages. Our goal is to automate chart creation in Google Apps and make the sometimes-tedious tasks of chart creation and updating a little more fun!


In the example above, we’ve hard-coded the data. You can also populate the table in any of these ways:
In the above chart, the only required methods are
Charts can also be used as Blobs. This allows Charts to be attached to Sites pages, saved to your Docs List, or attached to outgoing emails. The code below does all three of these things:
And that’s it. We hope you enjoy the new API. If your favorite chart is not here yet, or if you have ideas on how we could improve the API, please let us know in our forum. Finally, enjoy the income chart we’ve been building.

Want to weigh in on this topic? Discuss on Buzz
Read more »
Charts Ahoy!
Our initial launch includes six chart types. These can be attached to sites, sent as email attachments, or displayed using an Apps Script UiApp.4 Easy Steps to Create Charts
Step 1 - Open Apps Script Editor
You can access the Apps Script Editor from a Spreadsheet or a Google Sites Page. To access the Apps Script Editor from a Spreadsheet, Open a New Spreadsheet > Tools > Script Editor. To open the Script Editor from a Google Sites, More > Manage Site > Apps Scripts > Add New Script.Step 2 - Create a Data Table
To build a chart, the first thing you need is a data table. The data table contains the data for the chart as well as labels for each category. In general, data tables contain one column of labels followed by one or more columns of data series, with some variations. Read the documentation for the type of chart you’re creating to learn the exact data table format it expects. Here’s an example of how you’d create a data table in Apps Script to use with a column chart:function doGet() {
// Populate the DataTable. Well have the data labels in
// the first column, "Quarter", and then add two data columns,
// for "Income" and "Expenses"
var dataTable = Charts.newDataTable()
.addColumn(Charts.ColumnType.STRING, "Quarter")
.addColumn(Charts.ColumnType.NUMBER, "Income")
.addColumn(Charts.ColumnType.NUMBER, "Expenses")
.addRow(["Q1", 50, 60])
.addRow(["Q2", 60, 55])
.addRow(["Q3", 70, 60])
.addRow(["Q4", 100, 50])
.build();In the example above, we’ve hard-coded the data. You can also populate the table in any of these ways:
- Fetch the data from an existing spreadsheet using
SpreadsheetApp - With data from a
UiAppform - Using our JDBC API
- Using
UrlFetch - Or any other way in which you can get an array of data using Apps Script.
Step 3 - Build a Chart using Data Table
Once you have the data table ready, you can start building the chart. Our top-level Charts class has Builders for each of the chart types we support. Each builder is configured for the specific chart you’re building, exposing only methods which are available for the specific chart type. For example, in a Line Chart you can make the angles smooth, in Bar and Column Charts you can stack up the data, and in Pie Charts you can make the whole chart 3D!Here’s an example of using the above data table to build a Column Chart:// Build the chart. Well make income green and expenses red
// for good presentation.
var chart = Charts.newColumnChart()
.setDataTable(dataTable)
.setColors(["green", "red"])
.setDimensions(600, 400)
.setXAxisTitle("Quarters")
.setYAxisTitle("$")
.setTitle("Income and Expenses per Quarter")
.build();
In the above chart, the only required methods are
setDataTable() and build(), all of the others are optional. If you don’t set colors and dimensions, for instance, we’ll pick some default values for you. Use the different setter methods to customize your chart, however and whenever you feel like it.Step 4 - Publish your chart in Documents, Email, Sites or UiApp
Once you’ve built your chart, there are different things you can do with it. For example, you can add it to an Apps Script UI. You can add a chart to any part of the UI that takes a widget, including the application itself. The following code snippet shows you how to publish a chart withUiApp.// Add our chart to the UI and return it so that we can publish
// this UI as a service and access it via a URL.
var ui = UiApp.createApplication();
ui.add(chart);
return ui;}
Charts can also be used as Blobs. This allows Charts to be attached to Sites pages, saved to your Docs List, or attached to outgoing emails. The code below does all three of these things:
// Save the chart to our Document List
var file = DocsList.createFile(chart);
file.rename("Income Chart");
file.addToFolder(DocsList.getFolder("Charts"));

// Attach the chart to the active sites page.
var page = SitesApp.getActivePage();
page.addHostedAttachment(chart, "Income Chart");

 // Attach the chart to an email.
MailApp.sendEmail(
    "recipient@example.com",
    "Income Chart",  // Subject
    "Heres the latest income chart", // Content
    {attachments: chart });
And that’s it. We hope you enjoy the new API. If your favorite chart is not here yet, or if you have ideas on how we could improve the API, please let us know in our forum. Finally, enjoy the income chart we’ve been building.
 | Gustavo Moura Gustavo has been a Software Engineer at Google since 2007. He has been part of the Google Docs team since 2009. Prior to that, he worked on AdWords. |
Want to weigh in on this topic? Discuss on Buzz
Monday, March 9, 2015
Control your Google Sites from Apps Script
Last August we announced Google Apps Script, which allows you to automate many of the features of Google Apps using server-side scripts. Scripts can work with contacts, calendars, spreadsheets, mail and even call SOAP and REST web services, all using standard JavaScript. We just launched additional support for creating and accessing Google Sites using the new SitesApp Service.
// create a site, given the domain, site URL, site title and summary
Ryan Boyd
Read more »
Henry Lau, on the Google Apps Script team, has written a great tutorial on Creating a Soccer Club Homepage. In short, his script pulls upcoming Soccer matches from Google Calendar, creates a Google Site about the team and adds the Soccer team from Contacts as collaborators. Heres some snippets of the code.
// create a site, given the domain, site URL, site title and summary
var site = SitesApp.createSite("example.com", "rover", "Team Rover", "Well be the divisional champs this year!");
// create a page for each member of the team
var webpage = site.createWebPage("Jimmys Page", "JimmysPage", "Welcome to Jimmys site");
var webpage = site.createWebPage("Jimmys Page", "JimmysPage", "Welcome to Jimmys site");
// create a page for team announcements
var annPage = site.createAnnouncementsPage("Team Announcements", "Announcements", "New announcements for the team will be posted here.");
var annPage = site.createAnnouncementsPage("Team Announcements", "Announcements", "New announcements for the team will be posted here.");
// given one of the Google Calendar events, create an announcement
var message = "There will be a soccer match from " + event.getStartTime() + " until " + event.getEndTime() + "!";
site.createAnnouncement("Soccer Match #1", message, annPage);
site.createAnnouncement("Soccer Match #1", message, annPage);
Its that easy! Check out the documentation and get started building your scripts.
Of course, if you decide that youd rather create Google Sites via a REST interface, the recently-announced enhancements to the Sites Data API will allow you to write code in your language of choice to create and manage sites.
Ryan Boyd
Developer Relations - Google Apps
Tuesday, March 3, 2015
Fun Way to Get Your Kids to Stop Chatting!

This idea is actually a gem that one of my students thought of a few years ago! One of my classes favorite YouTube videos was this one... "If Youre a Boy" from Harry Kindergarten.
Well... my kids were chatty one day and I said "If youre a boy zip your lips." One of my girls said "If youre a boy, a boy, if youre a boy zip your lips!" And so a new tradition was born!
When my kids get chatty, all I do is start to sing the song!
If theyre extra loud, I have them do actions that will get the other students attention (e.g. ones that make them move more or make more noise) such as: pat your legs, jump up and down or clap your hands.
If theres only one or two students chatting, I usually do more silent action, such as zip your lips, fold your hands.
I actually also use this to get my students to clean up at the end of their writing period. I break it down step by step for them (since theyre kindergarten), so Ill say "If youre a boy, a boy, if youre a boy put your crayon away." Then I follow it by fold your hands, push in your chair, and walk to the carpet.
How do you get your kids to quiet down!
Hide Your Hard Disk Partition
Computer tips By Numan Shah
Privacy is the most important thing that everyone wants when using computer or laptop. Everyone wants to keep his personal files and folders hidden or he wants that no one can approach to his files or folders. We can do so many methods to hide our folders,files and other data. Even we can protect our partitions or folders using passwords. But in this new Computer tip, i have a new trick for you, in which you dont need to hide any single folder or a file. Neither you have to lock your folders or partitions nor you have to hide your files. In this post, i will tell you about how to hide your Hard Disk Partition or Drive. After following the simple steps you will be able to hide your Hard Disk Partition. All you need to do is to keep your personal data that you dont want to share, in one Partition, and hide it. You can unhide your Partition at any time.
Privacy is the most important thing that everyone wants when using computer or laptop. Everyone wants to keep his personal files and folders hidden or he wants that no one can approach to his files or folders. We can do so many methods to hide our folders,files and other data. Even we can protect our partitions or folders using passwords. But in this new Computer tip, i have a new trick for you, in which you dont need to hide any single folder or a file. Neither you have to lock your folders or partitions nor you have to hide your files. In this post, i will tell you about how to hide your Hard Disk Partition or Drive. After following the simple steps you will be able to hide your Hard Disk Partition. All you need to do is to keep your personal data that you dont want to share, in one Partition, and hide it. You can unhide your Partition at any time.
- Go to Start and Go to Command Prompt(CMD) and Run it.
- Write "Diskpart" in Command Prompt and press Enter key. After a second, Diskpart will appear.
- Write "List Volume" and see all your Partitions will appear.
- Now select the Volume that you want to Hide.
- Write "Remove Letter x" (x is the Drive letter you want to hide).
- Now go back and check in My Computer, You will see the Partition is no more showing.
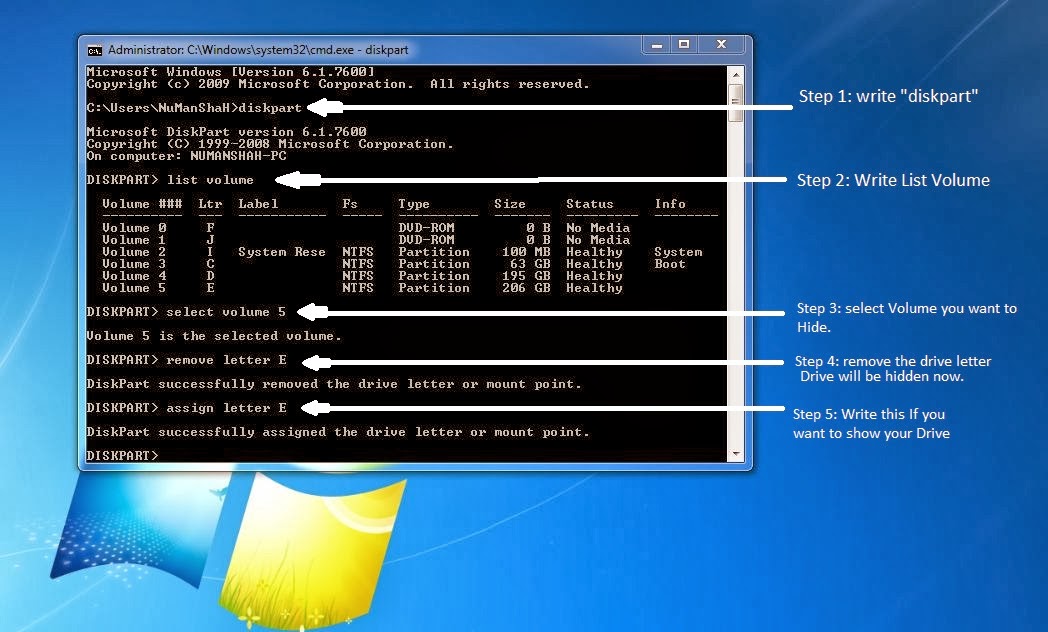 |
| Hide your Hard Disk Partition |
- If you want to unhide your Partition, Just repeat all the steps and replace Remove Letter x with Assign Letter x and Press Enter Key. Now go back and see the Partition will be showing up there in My Computer.
For more Computer Tips, Subscribe to our Blog. :)
Monday, March 2, 2015
Undo Your Last Action in a Program!
Did you type over your text and lose it? Or type text that you didnt mean to? To take back the last move you did in almost any program (Word, Publisher, PowerPoint, Blogger, and so many more!), just use this nifty keyboard shortcut!

Read more »
Sunday, March 1, 2015
Your Top 10 Videos That Inspire Us To Rethink The Way We Learn
- Starting point - 80+ Videos for Tech. & Media Literacy
- My Top 10 List (Vote or rearrange according to...)

I was last night exploring Dr. Alec Couros amazing list of videos for Tech. & Media Literacy, and then an idea popped in my wondering mind.
Ironically and sadly, many of us are still trying to persuade our dear fellow educators to rethink the way we educate and learn (even until today! Believe it or not!), but often fall short for one reason or the other. Lets face it, not all of us can inspire like Obama.
Ironically and sadly, many of us are still trying to persuade our dear fellow educators to rethink the way we educate and learn (even until today! Believe it or not!), but often fall short for one reason or the other. Lets face it, not all of us can inspire like Obama.
However, if we cant personally inspire mindset change, others perhaps can. Personally, I always use videos (usually short ones. 3-10 minutes) in my presentations to spark or inspire participants to think about, or rethink the way we learn and teach in the 21st century (It is already 2009!). Sometimes it works, sometimes it doesnt. But, overall participants get excited and appreciate whenever I have infused a relevant video or two in my presentations.
However, the real challenge is to choose the appropriate video(s) for the learning event, while taking into consideration all the racial, cultural or religious challenges it might cause. But before even getting there, we need to discover excellent videos. Dr. Alec Couros has done the world a great favor by sharing with us his amazing list. Thank you!
However, the real challenge is to choose the appropriate video(s) for the learning event, while taking into consideration all the racial, cultural or religious challenges it might cause. But before even getting there, we need to discover excellent videos. Dr. Alec Couros has done the world a great favor by sharing with us his amazing list. Thank you!
OBJECTIVE
Wouldnt it be nice if other learning professionals (or anyone for that sake!) shared their list of favorite learning videos with the rest of us. Lets virally share our favorite videos, enabling those that struggle to find such videos, find them more conveniently.
To be a bit more instructionally sound, lets create an objective for this video discovering event:
To be a bit more instructionally sound, lets create an objective for this video discovering event:
- To list and share our top 10 favorite videos that inspire us to rethink the way we learn and educate in the 21st century.
Besides the title, author and link (URL) to the video, please add a short description and why you selected that particular one (if possible).
MY TOP 10 LIST
Here is my current top 10 list of videos that inspire us to rethink the way we learn and educate:
- A Vision of Students Today (Michael Wesch)
Created to inspire teachers to use technology in engaging ways to help students develop higher level thinking skills. Equally important, it serves to motivate district level leaders to provide teachers with the tools and training to do so. - Do Schools Kill Creativity? (Ken Robinson)
Sir Ken Robinson makes an entertaining (and profoundly moving) case for creating an education system that nurtures creativity, rather than undermining it. - Did You Know? 3.0 (Created by Karl Fisch, and modified by Scott McLeod)
"Widely viewed video by Karl Fisch and Scott McLeod that gives light to the changes imminent in our emerging knowledge-based society. This is an excellent video for framing and introducing the new reality to students, teachers, faculty, and administrators." - Dr. Alec Couros - The Machine is Us/ing Us (Michael Wesch)
"Web 2.0" in just under 5 minutes. - Five Minute University (Father Guido Sarducci)
Father Guido Sarducci teaches what an average college graduate knows after five years from graduation in five minutes. The video gives humorous critique to learning in higher education. - Pay Attention (Darren Draper)
This presentation, simply entitled Pay Attention, was created by Darren Draper in an effort to motivate teachers to more effectively use technology in their teaching. - Teaching Teaching & Understanding Understanding (Claus Brabrand and Jacob Andersen)A 19-minute award-winning short-film about teaching at the University. It shows examples of good and bad teaching, and promotes constructive alignment learning approach using Solo Taxonomy to test students level of understanding (deep understanding?).
- Brain Rules (Dr. John Medina)
How do we learn? What exactly do sleep and stress do to our brains? Why is multi-tasking a myth? Why is it so easy to forget--and so important to repeat new information? Is it true that men and women have different brains? In Brain Rules, molecular biologist Dr. John Medina shares his lifelong interest in how the brain sciences might influence the way we teach our children and the way we work. In each chapter, he describes a brain rule - what scientists know for sure about how our brains work - and then offers transformative ideas for our daily lives. - Debunks Myths about the so-called "Developing World" (Hans Rosling)Youve never seen data presented like this. With the drama and urgency of a sportscaster, statistics guru Hans Rosling debunks myths about the so-called "developing world." Yes, we could learn a few tricks from him on how to inspire students to learn our topic for the day.
- PowerPoint Extreme Makeover (Dean Shareski)
How do you use PowerPoint effectively? Using Camtasia studio, Dean Shareski shows you what you can do to make your PowerPoint presentation more attractive, engaging and effective. - A Brave New World-Wide Web (David Truss)I know it is a top 10 list, but I just discovered this excellent learning video, and want to include it here (so I dont ever forget it!). It makes you reflect about how technology is changing the way we learn and teach, and is a great video to kick-start a discussion on using technology to facilitate learning.
YOUR TOP 10 LIST?
Wouldnt it be cool if we could do something similar to Jane Harts Top 10 Tools Lists of Learning Professionals 2009 for inspiring learning videos, and then do the top 100 and hoopla, hoopla, hoopla...! Jane, if you are reading this post, I would recommend that you take charge (seriously!) of this project (no money involved, just 1000s of more hits!). We could replicate, or reuse your template for learning tools, and do one for videos, too.
If not, we could use a wiki. If anyone has already posted their 10 top videos (or whatever list), please feel free to share it with us (in the comments section).
In short, I believe this inspiring project in the making could be really helpful to many enlightened and inspired educators (but perhaps not inspiring to others) out there that are looking for sparks (e.g. learning videos) that could inspire their fellow educators to rethink the way they educate and learn.
Educators who have shared their top 10 lists, or favorite learning videos (until now):
Lets get busy sharing our favorite learning videos with the rest of the learning world :)
If not, we could use a wiki. If anyone has already posted their 10 top videos (or whatever list), please feel free to share it with us (in the comments section).
In short, I believe this inspiring project in the making could be really helpful to many enlightened and inspired educators (but perhaps not inspiring to others) out there that are looking for sparks (e.g. learning videos) that could inspire their fellow educators to rethink the way they educate and learn.
Educators who have shared their top 10 lists, or favorite learning videos (until now):
- DigiZen
- Alfredo Calderón
- Tracey Mollins
Lets get busy sharing our favorite learning videos with the rest of the learning world :)
How to Make Your Text Small Caps
Ive designed a few wedding invitations for my friends and this tip definitely came in handy since I could use any font I wanted and make it look exactly the way I wanted!
Unfortunately this tip doesnt work in PowerPoint, but it does work in Microsoft Word! (And if you want to put it into PowerPoint, you can copy/paste from work and it will keep the formatting.) I have no idea why it does work directly in PowerPoint though!

I hope you can find some uses for this in your classroom projects... Id love to hear from you if you do!
Read more »
Unfortunately this tip doesnt work in PowerPoint, but it does work in Microsoft Word! (And if you want to put it into PowerPoint, you can copy/paste from work and it will keep the formatting.) I have no idea why it does work directly in PowerPoint though!
I hope you can find some uses for this in your classroom projects... Id love to hear from you if you do!
Saturday, February 28, 2015
How to Add a Facebook Like Button to Your Blogs Side Bar
This weeks poll was really exciting... the bloggers united to vote for adding a facebook like button to the side bar of the blog! You can check out how mine looks on the side of my blog under where it says "Social Networks!"

Check out the poll!

For the tutorial, youll this link:
https://developers.facebook.com/docs/reference/plugins/like-box/


For next weeks poll, Ill add another blogger tutorial - how to add a poll to your blog! Be sure to vote!
Read more »
Check out the poll!
For the tutorial, youll this link:
https://developers.facebook.com/docs/reference/plugins/like-box/
You can download this tutorial as a PDF by clicking this picture!
Note: This tutorial is hosted on Google Drive. To save it from there, just open the file and click File > Download to save onto your computer!
For next weeks poll, Ill add another blogger tutorial - how to add a poll to your blog! Be sure to vote!
Friday, February 27, 2015
Super Cute White Frames for Your TPT Products! Flash Giveaway!
I have to say I think I have more fun making frames and playing around with shapes than anything else! It definitely incorporates my love of math with my love of technology!
I finally decided to put together all of my white bracket/bubbly frames and make a set out of them! Check them out below! There are 38 different frames, each with and without a border for 76 total frames!!! Theyre normally $8 but the first person to guess which state Im going to be traveling to this summer will win them for free!
If youre not the winner, you can still grab the set while its on sale for tonight only for $6 instead of $8!

Happy guessing and be sure to leave your email address!
Update 9:15pm:
Congratulations to Liann at A Grade One Nut and Her Squirrelly Crew ! Im heading to Alaska this summer on a cruise with the hubby for our anniversary: 10 years since we started dating and two years since we got married!

Thanks to everyone else for all of your guesses! As for everyone who asked about making a tutorial: I have considered it but I made the frames in Adobe Illustrator which is a pretty expensive program. Ive been trying to keep my tutorials to free programs and programs that a lot of people have. I may write it up one day, but unfortunately it wont be in the near future. Sorry! :(
Read more »
I finally decided to put together all of my white bracket/bubbly frames and make a set out of them! Check them out below! There are 38 different frames, each with and without a border for 76 total frames!!! Theyre normally $8 but the first person to guess which state Im going to be traveling to this summer will win them for free!
If youre not the winner, you can still grab the set while its on sale for tonight only for $6 instead of $8!
Happy guessing and be sure to leave your email address!
Update 9:15pm:
Congratulations to Liann at A Grade One Nut and Her Squirrelly Crew ! Im heading to Alaska this summer on a cruise with the hubby for our anniversary: 10 years since we started dating and two years since we got married!
Thanks to everyone else for all of your guesses! As for everyone who asked about making a tutorial: I have considered it but I made the frames in Adobe Illustrator which is a pretty expensive program. Ive been trying to keep my tutorials to free programs and programs that a lot of people have. I may write it up one day, but unfortunately it wont be in the near future. Sorry! :(
Thursday, February 26, 2015
Quickly Switch Between Your Open Programs
Here is yet another keyboard shortcut that i use all the time! How to quickly switch between two (or more) open programs on your computer!

Read more »
How To Take a Video of Your Computer Screen
All of these Tuesdays are just flying by, and Im excited to offer another Technology Tuesday post... How to Take a Video of Your Computer Screen!

This has been in the poll for a while and Im very excited to finally blog about it!

Now, if youre doing this on a Mac or a PC, youre going to need two different programs... so I wrote up a walk through for each program! Im posting the PC tutorial first, but if youre looking for the Mac tutorial, keep scrolling down!
The PC tutorial requires the free program CamStudio, which you can download here.


For the next poll, Im going to add the option to make your icons into pictures. I use the icons for my folders for the different content areas just to make it a little cuter and easier to find! If youd like me to blog about this, be sure to vote for it in the poll!

Read more »
This has been in the poll for a while and Im very excited to finally blog about it!
Now, if youre doing this on a Mac or a PC, youre going to need two different programs... so I wrote up a walk through for each program! Im posting the PC tutorial first, but if youre looking for the Mac tutorial, keep scrolling down!
The PC tutorial requires the free program CamStudio, which you can download here.
Now... onto the Mac tutorial!
You can download this tutorial as a PDF by clicking this picture!
Note: This tutorial is hosted on Google Docs. To save it from there, just open the file and click File > Download to save onto your computer!
For the next poll, Im going to add the option to make your icons into pictures. I use the icons for my folders for the different content areas just to make it a little cuter and easier to find! If youd like me to blog about this, be sure to vote for it in the poll!
Wednesday, February 11, 2015
The 5 Best Ways to Build Quality Backlinks for Your Website or Blog

No one can deny the fact that backlinks are vital for the success of your online business – they will play a big role in determining your search engine rankings. However, the thing you need to understand is that after the latest Google updates, the quality of backlinks is more important than the quantity of those links. It means, not only do you need some diversity in your link pool, but you also need to ensure that those links come from high PR, authoritative websites.
Also Read: Tips on How to Have Better SEO Results with Link Building
Also Read: Best Way to Easily Find and Remove Broken Links from your Website or Blog
Many people often make a mistake when judging the quality of backlinks. Unfortunately, they are not like diamonds that you can rate considering clarity, cut, color, and other features. Backlinks are different, and they cannot be graded using any simple scale. Still, when you get a backlink from a website, the search engines will rate them as okay, good, mildly good, or excellent.
As it is not easy to have one single definition of quality backlinks, you have to find another way to make your link building campaign work effectively. A better idea would be to ensure that you dont go for bad backlinks. A backlink that is not bad will be considered good for your link building campaign, and here are a few ways to avoid bad links and fetch good links.
How to Build Quality Backlinks for Your Website or Blog
Take Full Advantage of Guest Posting
Writing guest posts on other blogs is a good way of getting quality links. You need to ensure that you pick a blog that is relevant to your theme. It is worth mentioning that the links from these blogs are considered good because you will have your post approved by a human webmaster, which is something that makes Google think that you know the topic well, and might have an informative site too.Remember, your guest posts will work if they hold some value for the blog owner, and, at the same time, are relevant to your website/blog. Therefore, you should try to tailor the content of your post to fulfill this requirement, and its not that difficult too. For instance, if your blog is about leather care and maintenance, you can easily write and publish that post on a blog that sells leather jackets and shoes.
Also Read: How to Find the Websites or Blogs that are Copying your Content?
Use Credible Article Marketing Websites
Even though the value of article marketing is no longer the same as it was a few years ago – thanks to Google Panda and Penguin updates – you can still find a few legitimate sites to publish your articles. You can use these sites to post your article and have a link placed in the article that points back to your blog. Quite like guest posting, you can again write articles on topics that have some connection with your blog. Just make sure you pick a right category on these article-marketing sites to submit your article.Using these sites is a lot easier than getting your article published on another blog, and thats one of the reasons why guest posting holds more value as compared to simple article marketing. Still, you can use these sites to diversify your link pool. You can find a category according to the theme of your blog and post as many articles as you can – though its a good idea to stick with one-article-a-week policy.
Add Your Links to Comments Sections
For this, you can pick blogs, article sites, and websites where they have a comment section. You simply need to make a productive comment and embed your link to your key phrase. This works quite well, but the only consideration is that youre going to get the link juice only if you opt for a comment section that comes with "do-follow" tag. It may take some time to find it, but you will accomplish the task after conducting some research.Also Read: The Top 10 Websites to create free Logo for your Blog
Get Links from Directories
This is still a good way of getting backlink, but the catch is to find a legitimate and well-followed directory – this could well be a paid directory. Although you can try some free directories like Google locations, you will be better off making use of paid directories like Yelp.Make Use of Forum Postings
Making posts in forums, with your link attached to your keyword, is still effective. However, you dont always need to make posts; you can simply convince the forum administrator to place a link to your blog – it is difficult, but not impossible.About Author:
Kate Funk is a writer and tutor at tutorleader.com. She loves covering writing tips and strategies for blogging.
Image source: http://www.psdgraphics.com/file/seamless-chrome-chain.jpg
Wednesday, February 4, 2015
Cherry Mobile Axis Stock ROM firmware to unbrick your phone
Hi,
This firmware was uploaded several days ago, but I was unable to make a tutorial because I do not have a CM Axis on-hand. This phone has a BROADCOM chipset, it use different tools. Unlike MTK that I already have a tutorial.
But I will redirect you androidXDA which have the tutorial. I will only provide the firmware.

Download the firmware here
Part 1--> CM Axis
Part 2--> CM Axis
Part 3--> CM Axis
Part 4--> CM Axis
Part 5--> CM Axis
Tutorial -- > PDF File
"Join and extract the file via WinRar or 7zip"
For Tutorial go here
Credits to androidXDA
http://androidxda.com/use-broadcom-multidownloader-flash-firmware
Tested by:
Alexander Galo
Read more »
This firmware was uploaded several days ago, but I was unable to make a tutorial because I do not have a CM Axis on-hand. This phone has a BROADCOM chipset, it use different tools. Unlike MTK that I already have a tutorial.
But I will redirect you androidXDA which have the tutorial. I will only provide the firmware.
Download the firmware here
Part 1--> CM Axis
Part 2--> CM Axis
Part 3--> CM Axis
Part 4--> CM Axis
Part 5--> CM Axis
Tutorial -- > PDF File
"Join and extract the file via WinRar or 7zip"
For Tutorial go here
Credits to androidXDA
http://androidxda.com/use-broadcom-multidownloader-flash-firmware
Tested by:
Alexander Galo
Subscribe to:
Posts (Atom)