Thursday, March 12, 2015
Facilitating a retrospective with 50 people in an hour
There were a few constraints that made this retrospective challenging. First, due to our volunteer responsibilities we had just under an hour to eat lunch and complete the retrospective. Second, there are about 50 volunteers - allowing everyone to have a voice in such a short time frame would be a challenge. Third, it was important to all of us to celebrate the things that went well and also give a clear, prioritized list of ideas to future volunteer teams.
After discussing the constraints and various facilitation options with some of you, here is what we did:
1. Instead of building a timeline of our experiences we held the retrospective in our volunteer room. Throughout the week we had plastered the walls with our schedules (including happy/sad faces), guidelines, issues, ideas for improvement, etc which then served as visual provocations for the retrospective.
 |
| Picture courtesy of Adam Yuret |
3. We split into 5 groups of 10. Each group would perform a retrospective step together before sharing their results with the larger group.
4. The two major prompts we used in the retrospective were:
 | |
| The combined greats |
- "Do differently". Once again, each table wrote these in silence, read them out loud to each other, and then voted in silence. The top 3 items from each table were again shared with the rest of the tables and consolidated into one larger list.
5. Finally, we posted pictures of all the results (yes, every single post-it note) on the Agile Conference Volunteers Facebook page for later reference and comments.
It was a lot of fun and seemed to work well given the constraints. We achieved our goal of giving everyone a voice in a short time period, celebrating what went well, and also producing a nice list of actionable ideas for next year. Anything you would do differently?

Monday, March 9, 2015
Building an Idea Bank using Google Apps Script
Editor’s Note: This is a guest post by Saqib Ali. Saqib is a Google Apps evangelist at Seagate. He has used Apps Script to create a number of applications that leverage Google Apps. His other interests include the curation of Lewis Carroll’s letter and translation of Urdu poetry to English. -- Ryan Boyd
What is an Idea Bank?
Idea Banks are repositories for innovative ideas that Seagate employees can submit, and others can vote on those ideas. Before Google Apps Script we had a custom built Idea Bank on the LAMP stack. With the release of the UI Services in the Google Apps Script, we wanted to port that Idea Bank to Google Apps to easily manage idea submissions in a Google Spreadsheet.
Designing the Idea Bank
A typical Idea Bank consists of three basic functions:
- Ability to submit and store ideas to a central database.
- Ability to vote on ideas.
- Ability to add description comment on ideas.
A traditional application would probably use a Relational Database like MySQL to store the ideas. However we found that using Google Spreadsheet to store the ideas provides two inherent benefits:
- Entered data can be easily managed using the Spreadsheet Editor;
- Revision history. Since Spreadsheet provides built-in revision history, we don’t have to create a system for tracking the changes to the submitted ideas.
The number of votes, and the voters are tracked using cells in the spreadsheet. For voters we used the Session.getUser().getEmail() to get the email address of the logged in user, and store them in the spreadsheet.
Since the Ideas Bank is embedded in a Google Site, we were able to simply use the Google Sites Page as a place holder to add description and comments to the ideas. Once the idea is submitted, a Google Sites page gets created corresponding to that idea from predefined template using the createPageFromTemplace() function. The submitter can then add detailed description in the template. Others can add comments to that Site pages.
Implementation Details
Using Spreadsheet Services to Manage Data
All the data is stored in a Google Spreadsheet, which makes it easy for the Idea Bank manager to manage (delete, remove, modify) the ideas using the Spreadsheets Editor.
Code snippet for adding new ideas to the spreadsheet:
var ss = SpreadsheetApp.openById("");  // Spreadsheet id goes here
SpreadsheetApp.setActiveSpreadsheet(ss);
ideas_sheet =  SpreadsheetApp.getActiveSpreadsheet().getSheetByName("Ideas");

var last_row = ideas_sheet.getLastRow();
var next_empty_row = last_row+1;

ideas_sheet.setActiveCell("A"+next_empty_row);
ideas_sheet.getActiveCell().setValue(e.parameter.ideadescription);
ideas_sheet.setActiveCell("B"+next_empty_row);
ideas_sheet.getActiveCell().setValue(Session.getActiveUser().getUserLoginId());
ideas_sheet.setActiveCell("E"+next_empty_row);
ideas_sheet.getActiveCell().setValue(Session.getActiveUser().getEmail());
Code snippet to read the ideas from the Spreadsheet and display them:
var ss = SpreadsheetApp.openById(""); // Spreadsheet id goes here
SpreadsheetApp.setActiveSpreadsheet(ss);
ideas_sheet =  SpreadsheetApp.getActiveSpreadsheet().getSheetByName("Ideas");

var last_row = ideas_sheet.getLastRow();
var last_column = ideas_sheet.getLastColumn();
var sheet_array = ideas_sheet.getRange(2, 1, last_row, last_column).getValues();

var submitIdeaButton = app.createButton("I have another idea");
var submitIdeaButtonHandler = app.createServerClickHandler(showSubmitIdeaDialog);
submitIdeaButton.addClickHandler(submitIdeaButtonHandler);
applyCSS(submitIdeaButton, _submitideabutton);

var ideaContents = app.createGrid().resize(last_row,3);
ideaContents.setId("ideacontents");
ideaContents.setWidth("100%");
ideaContents.setCellSpacing(0);
scrollPanel.add(ideaContents);
app.add(scrollPanel);

for (var row_i = 0; row_i < last_row-1; row_i++) {
  var ideaDescriptionLabel = app.createLabel(sheet_array[row_i][0]).setStyleAttribute("font","16px Sans-serif").setWordWrap(true);
  var submitter = sheet_array[row_i][1].split("@");
  var ideaAuthor = app.createLabel(submitter[0]).setStyleAttribute("font","10px Courier New, Courier, monospace").setStyleAttribute("color", "#CCC")
  ideaContents.setWidget(row_i, 0, app.createVerticalPanel().add(ideaDescriptionLabel).add(ideaAuthor)).setStyleAttribute("overflow","visible").setStyleAttribute("white-space","normal !important");

  //Button to display the voters
  var numberOfVotesForm = app.createFormPanel().setId(numofvotesform);
  var numberOfVotesFormContent = app.createVerticalPanel()
  numberOfVotesForm.add(numberOfVotesFormContent);
  numberOfVotesFormContent.add(app.createTextBox().setName(ideaID).setText(row_i + "").setVisible(false).setSize("0","0"));
  numberOfVotesFormContent.add(app.createTextBox().setName(voters).setText(sheet_array[row_i][4]).setVisible(false).setSize("0","0"));
  var numberOfVotesButton = app.createButton(countVotes(sheet_array[row_i][4]) + " vote(s)").setId("numberOfVotesButton"+row_i);
  applyCSS(numberOfVotesButton, _numofvotesbutton);
  var numberOfVotesButtonHandler = app.createServerClickHandler(showVotersDialog);
  numberOfVotesButtonHandler.addCallbackElement(numberOfVotesFormContent);
  numberOfVotesButton.addClickHandler(numberOfVotesButtonHandler);
  numberOfVotesFormContent.add(numberOfVotesButton);

  //Button to cast a vote
  var voteForm = app.createFormPanel().setId(voteform);
  var voteFormContent = app.createVerticalPanel();
  voteForm.add(voteFormContent);
  voteFormContent.add(app.createHidden(ideaID, row_i + "").setSize("0","0"))

  // Identify the function schedule as the server click handler
  var voteButton = app.createButton(I like this!).setId("voteButton"+row_i)
  var voteButtonHandler = app.createServerClickHandler(casteVote);
  voteButtonHandler.addCallbackElement(voteFormContent);
  voteButton.addClickHandler(voteButtonHandler);
  if (sheet_array[row_i][4].indexOf(Session.getActiveUser().getEmail())>-1)
    voteFormContent.add(voteButton.setText("Thanks!").setEnabled(false));
  else
    voteFormContent.add(voteButton);

  ideaContents.setWidget(row_i, 1, numberOfVotesForm);
  ideaContents.setWidget(row_i, 2, voteForm);
}
app.add(submitIdeaButton);
Using Ui Services to embed User Interface in Google Sites
Ui Service was used to build the front end for the app. UI Services are based on GWT, so it is a good idea to have a basic understanding of the GWT framework. The following were used in building this app:
- Horizontal panel to display each idea;
- Vertical panel to display the list of ideas;
- Simple button to cast votes and submit ideas;
- Form panel to accept new ideas.


A real live working example is available here. Full source code is available here.
But why Google Apps Script?
So why did I choose Google Apps Script? Well for one it is at no extra cost, comes with your Google Account, it is in the cloud (i.e. no servers required), integrates well with Google Sites and Spreadsheets, and most importantly it uses GWT UI widgets. Google Apps Script’s UI Services and the ability to easily integrate with any REST interface make Apps Script an easy choice.
 | Saqib Ali Saqib is a Google Apps evangelist at Seagate. He has used Apps Script to create a number of applications that leverage Google Apps. His other interests include the curation of Lewis Carroll’s letter and translation of Urdu poetry to English. |
Friday, February 27, 2015
LN01 How to Become an Expert

LEARNING NUGGET 01
TOOLS USED?
- iPad
- PowerPoint (2013)
- Google Drive
- Explain Everything
- How to be an expert? (diagram)
- The 10,000 Hour Rule!(Infographic)
HOW?
- Created quickly a visual storyboard in PowerPoint (2013). No narration scripts were created this time.
- Created or mashed-up all the graphics in PowerPoint (2013). Remove Background, Group (items) and Save as Picture are really useful PowerPoint features to cook up your own graphics.
- Graphics created or mashed-up were grouped (if needed) and then saved using the Save as Picture feature to PNG format to keep the background transparent.
- All the graphics were then uploaded (synched) to Google Drive.
- This time around, I imported the graphics from Google Drive to respective slides using the Explain Everything authoring tool on my iPad (It supports direct import from Dropbox, Evernote, iTunes and WebDAV, too).
- Used Explain Everything on my iPad to record audio (and video for one slide), and add the visual animations to the slides (concurrently). No headset with microphone was used. Sat in a reasonably quiet room to avoid background noise.
- Once completed, the content was published directly to YouTube from Explain Everything (cool feature).
- Mission accomplished!
LESSONS LEARNED!
- Visual Storyboarding (20 min)
- Finding and mashing-up Graphics (30 min)
- Slide Creation in Explain Everything (10 min)
- Recording audio and animation (80 min)
- Publishing (10 min)
Thursday, February 26, 2015
Lessons Learned from Students use of an Online Learning Environment
"This article highlights the lessons learned from recent research into the use made of an online learning environment by workplace-based students...
(Lessons Learned) The students, being workplace-based, often found that they had distinct blocks of free time to spend studying and said that if the materials were structured into timed units, more effective workplace study could be facilitated. Although the idea of tightly timed units is counter to the idea of self-paced, needs-based learning, on a practical level it may be beneficial to students trying to fit study into their working days. Although the students appreciated the activities provided, they stated that they would have preferred more of them, and more interactivity within them.
Wednesday, February 18, 2015
C Program to delete an element from an Array
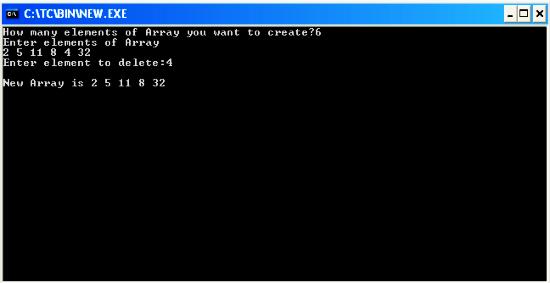
#include<iostream.h>
#include<process.h>
#include<conio.h>
void main()
{
clrscr();
int a[50],x,n,i,j,b[50];
cout<<"How many elements of Array you want to create?";
cin>>n;
cout<<"Enter elements of Array
";
for(i=0;i<n;++i)
cin>>a[i];
cout<<"Enter element to delete:";
cin>>x;
for(i=0,j=0;i<n;++i)
{
if(a[i]!=x)
b[j++]=a[i];
}
if(j==n)
{
cout<<"
Soory!!!Element is not in the Array";
exit(0);
}
else
{
cout<<"
New Array is ";
for(i=0;i<j;i++)
cout<<b[i]<<" ";
}
getch();
}
Sunday, February 15, 2015
Resize an Amazon EBS Volume Cent OS with CPanel

- Create a snapshot of the volume you want to resize.
- Create a new bigger volume from the snapshot.
- power off (Stop) the Instance.
- Check the old volumes attachment information if you are not familiar with this (You will need to specify this on device: /dev/sda1).
- Detach the old volume.
- Attach the new bigger volume.
- Power on (Start) the instance.
- Go to WHM and log in as root
- Check if your servers ip has changed (it most definitely will) (IP Functions> Show IP Address Usage) copy the ip that will have your servers name.
- Go to (Server Configuration>Basic cPanel & WHM Setup).
- Go to Basic config change the ip address to the servers shared ip address that you copied above.
- Go to your WHM backend (Resellers>Manage resellers main/shared IP) and change all resellers ips to the servers main shared ip.
- Go to (Account Information>List Accounts) Edit the ips of all the accounts listed there to your servers ip (you copied it earlier).
- Ping your elastic IP (your Security Group should allow: ICMP from 0.0.0.0/0)-Not a requirement for this tutorial it just helps you see if the server is up.
- You now need to restart the server for the ip changes to take effect. (System Reboot>Graceful Server Reboot).
- When the server comes back up you will be able to see it pinging.
- You can now access your websites again and you have managed to attach a bigger EBS volume however the additional space is not being recognized.
- To check space (From SSH- run: #df -h) (From WHM: Server Status>Server Information)
- To resize the volume (connect via SSH and run:#resize2fs /dev/sda1) you will see something like this (Performing an on-line resize of /dev/sda1 to 131072000 (4k) blocks.)
- When it completes it will display (The filesystem on /dev/sda1 is now 131072000 blocks long.)
- If you now check from SSH or CPanel (see step 17) you will see that now all the volumes space is available

Wednesday, February 11, 2015
C program to find whether a given character is an alphabet digit or any special character using ASCII values
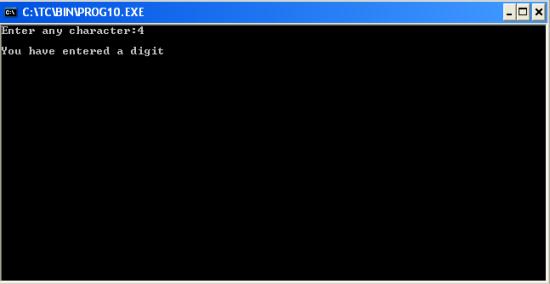
#include<conio.h>
void main()
{
char ch;
clrscr(); //to clear the screen
printf("Enter any character:");
scanf("%c",&ch);
printf("
You have entered an alphabet");
else
if(ch>=0&&ch<=9)
printf("
You have entered a digit");
else
printf("
You have entered a special character");
getch(); //to stop the screen
}